
Spring
Spring
Spring是什么
Spring 自诞生以来一直备受青睐,它包括许多框架,例如 Spring framework、SpringMVC、SpringBoot、Spring Cloud、Spring Data、Spring Security 等,所以有人将它们亲切的称之为:Spring 全家桶。
Spring framework 就是我们平时说的 Spring 框架,本套教程我们将 Spring framework 简称为 Spring 框架。Spring 框架是全家桶内其它框架的基础和核心,下面让我们来认识 Spring 框架吧。
Spring 是目前主流的 Java Web 开发框架,是 Java 世界最为成功的框架。该框架是一个轻量级的开源框架,具有很高的凝聚力和吸引力。
Spring 由 Rod Johnson 创立,2004 年发布了 Spring 框架的第一版,其目的是用于简化企业级应用程序开发的难度和周期。
Spring 是分层的 Java SE/EE 一站式轻量级开源框架,以 IoC(Inverse of Control,控制反转)和 AOP(Aspect Oriented Programming,面向切面编程)为内核。
IoC 指的是将对象的创建权交给 Spring 去创建。使用 Spring 之前,对象的创建都是由我们使用 new 创建,而使用 Spring 之后,对象的创建都交给了 Spring 框架。AOP 用来封装多个类的公共行为,将那些与业务无关,却为业务模块所共同调用的逻辑封装起来,减少系统的重复代码,降低模块间的耦合度。另外,AOP 还解决一些系统层面上的问题,比如日志、事务、权限等。
在 Spring 中,认为一切 Java 类都是资源,而资源都是类的实例对象(Bean),容纳并管理这些 Bean 的是 Spring 所提供的 IoC 容器,所以 Spring 是一种基于 Bean 的编程,它深刻地改变着 Java 开发世界,使用基本的 JavaBean 来完成以前只有 EJB 才能完成的工作,使得很多复杂的代码变得优雅和简洁,避免了 EJB 臃肿、低效的开发模式,极大的方便项目的后期维护、升级和扩展。迅速地取代 EJB 成为了实际的开发标准。
在实际开发中,服务器端通常采用三层体系架构,分别为表现层(web)、业务逻辑层(service)、持久层(dao)。
Spring 致力于 Java EE 应用各层的解决方案,对每一层都提供了技术支持。在表现层提供了与 Spring MVC、Struts2 框架的整合,在业务逻辑层可以管理事务和记录日志等,在持久层可以整合 MyBatis、Hibernate 和 JdbcTemplate 等技术。这就充分体现出 Spring 是一个全面的解决方案,对于已经有较好解决方案的领域,Spring 绝不做重复的事情。
从某个程度上来看,Spring 框架充当了黏合剂和润滑剂的角色,能够将相应的 Java Web 系统柔顺地整合起来,并让它们更易使用。同时其本身还提供了声明式事务等企业级开发不可或缺的功能。
从设计上看,Spring 框架给予了 Java 程序员更高的自由度,对业界的常见问题也提供了良好的解决方案,因此,在开源社区受到了广泛的欢迎,并且被大部分公司作为 Java 项目开发的首选框架。
Spring 作为实现 Java EE 的一个全方位应用程序框架,为开发企业级应用提供了一个健壮、高效的解决方案。它不仅可以应用于服务器端开发,也可应用于任何 Java 应用的开发。
Spring 框架具有以下几个特点。
方便解耦,简化开发
Spring 就是一个大工厂,可以将所有对象的创建和依赖关系的维护交给 Spring 管理。
方便集成各种优秀框架
Spring 不排斥各种优秀的开源框架,其内部提供了对各种优秀框架(如 Struts2、Hibernate、MyBatis 等)的直接支持。
降低 Java EE API 的使用难度
Spring 对 Java EE 开发中非常难用的一些 API(JDBC、JavaMail、远程调用等)都提供了封装,使这些 API 应用的难度大大降低。
方便程序的测试
Spring 支持 JUnit4,可以通过注解方便地测试 Spring 程序。
AOP 编程的支持
Spring 提供面向切面编程,可以方便地实现对程序进行权限拦截和运行监控等功能。
声明式事务的支持
只需要通过配置就可以完成对事务的管理,而无须手动编程。
作为 Java 程序员,对 Spring 的理解和掌握程度,基本上就是编程能力的体现。
Spring IoC容器
IoC 容器是 Spring 的核心,也可以称为 Spring 容器。Spring 通过 IoC 容器来管理对象的实例化和初始化,以及对象从创建到销毁的整个生命周期。
Spring 中使用的对象都由 IoC 容器管理,不需要我们手动使用 new 运算符创建对象。由 IoC 容器管理的对象称为 Spring Bean,Spring Bean 就是 Java 对象,和使用 new 运算符创建的对象没有区别。
Spring 通过读取 XML 或 Java 注解中的信息来获取哪些对象需要实例化。
Spring 提供 2 种不同类型的 IoC 容器,即 BeanFactory 和 ApplicationContext 容器。
BeanFactory 容器
BeanFactory 是最简单的容器,由 org.springframework.beans.factory.BeanFactory 接口定义,采用懒加载(lazy-load),所以容器启动比较快。BeanFactory 提供了容器最基本的功能。
为了能够兼容 Spring 集成的第三方框架(如 BeanFactoryAware、InitializingBean、DisposableBean),所以目前仍然保留了该接口。
简单来说,BeanFactory 就是一个管理 Bean 的工厂,它主要负责初始化各种 Bean,并调用它们的生命周期方法。
BeanFactory 接口有多个实现类,最常见的是 org.springframework.beans.factory.xml.XmlBeanFactory。使用 BeanFactory 需要创建 XmlBeanFactory 类的实例,通过 XmlBeanFactory 类的构造函数来传递 Resource 对象。如下所示。
1 | Resource resource = new ClassPathResource("applicationContext.xml"); |
ApplicationContext 容器
ApplicationContext 继承了 BeanFactory 接口,由 org.springframework.context.ApplicationContext 接口定义,对象在启动容器时加载。ApplicationContext 在 BeanFactory 的基础上增加了很多企业级功能,例如 AOP、国际化、事件支持等。
ApplicationContext 接口有两个常用的实现类,具体如下。
ClassPathXmlApplicationContext
该类从类路径 ClassPath 中寻找指定的 XML 配置文件,并完成 ApplicationContext 的实例化工作,具体如下所示。
1 | ApplicationContext applicationContext = new ClassPathXmlApplicationContext(String configLocation); |
在上述代码中,configLocation 参数用于指定 Spring 配置文件的名称和位置,如 Beans.xml。
FileSystemXmlApplicationContext
该类从指定的文件系统路径中寻找指定的 XML 配置文件,并完成 ApplicationContext 的实例化工作,具体如下所示。
1 | ApplicationContext applicationContext = new FileSystemXmlApplicationContext(String configLocation); |
它与 ClassPathXmlApplicationContext 的区别是:在读取 Spring 的配置文件时,FileSystemXmlApplicationContext 不会从类路径中读取配置文件,而是通过参数指定配置文件的位置。即 FileSystemXmlApplicationContext 可以获取类路径之外的资源,如“F:/workspaces/Beans.xml”。
通常在 Java 项目中,会采用 ClassPathXmlApplicationContext 类实例化 ApplicationContext 容器的方式,而在 Web 项目中,ApplicationContext 容器的实例化工作会交由 Web 服务器完成。Web 服务器实例化 ApplicationContext 容器通常使用基于 ContextLoaderListener 实现的方式,它只需要在 web.xml 中添加如下代码:
1 | <!--指定Spring配置文件的位置,有多个配置文件时,以逗号分隔--> |
需要注意的是,BeanFactory 和 ApplicationContext 都是通过 XML 配置文件加载 Bean 的。
二者的主要区别在于,如果 Bean 的某一个属性没有注入,使用 BeanFacotry 加载后,第一次调用 getBean() 方法时会抛出异常,而 ApplicationContext 则会在初始化时自检,这样有利于检查所依赖的属性是否注入。
因此,在实际开发中,通常都选择使用 ApplicationContext,只有在系统资源较少时,才考虑使用 BeanFactory。本教程中使用的是 ApplicationContext 容器。
Spring Bean定义
由 Spring IoC 容器管理的对象称为 Bean,Bean 根据 Spring 配置文件中的信息创建。
可以把 Spring IoC 容器看作是一个大工厂,Bean 相当于工厂的产品,如果希望这个大工厂生产和管理 Bean,则需要告诉容器需要哪些 Bean,以及需要哪种方式装配 Bean。
Spring 配置文件支持两种格式,即 XML 文件格式和 Properties 文件格式。
- Properties 配置文件主要以 key-value 键值对的形式存在,只能赋值,不能进行其他操作,适用于简单的属性配置。
- XML 配置文件是树形结构,相对于 Properties 文件来说更加灵活。XML 配置文件结构清晰,但是内容比较繁琐,适用于大型复杂的项目。
通常情况下,Spring 的配置文件使用 XML 格式。XML 配置文件的根元素是 <beans>,该元素包含了多个子元素 <bean>。每一个 <bean> 元素都定义了一个 Bean,并描述了该 Bean 如何被装配到 Spring 容器中。
Beans.xml 配置文件,代码如下所示:
1 |
|
上述代码中,使用 id 属性定义了 Bean,并使用 class 属性指定了 Bean 对应的类。
<bean> 元素中可以包含很多属性,其常用属性如下表所示。
| 属性名称 | 描述 |
|---|---|
| id | Bean 的唯一标识符,Spring 容器对 Bean 的配置和管理都通过该属性完成。id 的值必须以字母开始,可以使用字母、数字、下划线等符号。 |
| name | name 属性中可以为 Bean 指定多个名称,每个名称之间用逗号或分号隔开。Spring 容器可以通过 name 属性配置和管理容器中的 Bean。 |
| class | 该属性指定了 Bean 的具体实现类,它必须是一个完整的类名,即类的全限定名。 |
| scope | 用于设定 Bean 实例的作用域,属性值可以为 singleton(单例)、prototype(原型)、request、session 和 global Session。其默认值是 singleton |
| constructor-arg | <bean>元素的子元素,可以使用此元素传入构造参数进行实例化。该元素的 index 属性指定构造参数的序号(从 0 开始),type 属性指定构造参数的类型 |
| property | <bean>元素的子元素,用于调用 Bean 实例中的 setter 方法来属性赋值,从而完成依赖注入。该元素的 name 属性用于指定 Bean 实例中相应的属性名 |
| ref | <property> 和 <constructor-arg> 等元素的子元索,该元素中的 bean 属性用于指定对某个 Bean 实例的引用 |
| value | <property> 和<constractor-arg>等元素的子元素,用于直接指定一个常量值 |
| list | 用于封装 List 或数组类型的依赖注入 |
| set | 用于封装 Set 类型的依赖注入 |
| map | 用于封装 Map 类型的依赖注入 |
| entry | <map> 元素的子元素,用于设置一个键值对。其 key 属性指定字符串类型的键值,ref 或 value 子元素指定其值 |
| init-method | 容器加载 Bean 时调用该方法,类似于 Servlet 中的 init() 方法 |
| destroy-method | 容器删除 Bean 时调用该方法,类似于 Servlet 中的 destroy() 方法。该方法只在 scope=singleton 时有效 |
| lazy-init | 懒加载,值为 true,容器在首次请求时才会创建 Bean 实例;值为 false,容器在启动时创建 Bean 实例。该方法只在 scope=singleton 时有效 |
Spring Bean作用域
在配置文件中,除了可以定义 Bean 的属性值和相互之间的依赖关系,还可以声明 Bean 的作用域。例如,如果每次获取 Bean 时,都需要一个 Bean 实例,那么应该将 Bean 的 scope 属性定义为 prototype,如果 Spring 需要每次都返回一个相同的 Bean 实例,则应将 Bean 的 scope 属性定义为 singleton。
作用域的种类
Spring 容器在初始化一个 Bean 实例时,同时会指定该实例的作用域。Spring 5 支持以下 6 种作用域。
singleton
默认值,单例模式,表示在 Spring 容器中只有一个 Bean 实例,Bean 以单例的方式存在。
prototype
原型模式,表示每次通过 Spring 容器获取 Bean 时,容器都会创建一个 Bean 实例。
request
每次 HTTP 请求,容器都会创建一个 Bean 实例。该作用域只在当前 HTTP Request 内有效。
session
同一个 HTTP Session 共享一个 Bean 实例,不同的 Session 使用不同的 Bean 实例。该作用域仅在当前 HTTP Session 内有效。
application
同一个 Web 应用共享一个 Bean 实例,该作用域在当前 ServletContext 内有效。
类似于 singleton,不同的是,singleton 表示每个 IoC 容器中仅有一个 Bean 实例,而同一个 Web 应用中可能会有多个 IoC 容器,但一个 Web 应用只会有一个 ServletContext,也可以说 application 才是 Web 应用中货真价实的单例模式。
websocket
websocket 的作用域是 WebSocket ,即在整个 WebSocket 中有效。
注意:Spring 5 版本之前还支持 global Session,该值表示在一个全局的 HTTP Session 中,容器会返回该 Bean 的同一个实例。一般用于 Portlet 应用环境。Spring 5.2.0 版本中已经将该值移除了。
request、session、application、websocket 和 global Session 作用域只能在 Web 环境下使用,如果使用 ClassPathXmlApplicationContext 加载这些作用域中的任意一个的 Bean,就会抛出以下异常。
java.lang.IllegalStateException: No Scope registered for scope name ‘xxx’
下面我们详细讲解常用的两个作用域:singleton 和 prototype。
singleton
singleton 是 Spring 容器默认的作用域。当 Bean 的作用域为 singleton 时,Spring 容器中只会存在一个共享的 Bean 实例。该 Bean 实例将存储在高速缓存中,并且所有对 Bean 的请求,只要 id 与该 Bean 定义相匹配,都会返回该缓存对象。
通常情况下,这种单例模式对于无会话状态的 Bean(如 DAO 层、Service 层)来说,是最理想的选择。
在 Spring 配置文件中,可以使用
1 | <bean id="..." class="..." scope="singleton"/> |
例 1
下面使用 Eclipse IDE 演示如何将 Bean 的作用域指定为 singleton,步骤如下:
- 创建 SpringDemo 项目,并在 src 目录下创建 net.biancheng 包。
- 添加相应的 jar 包,可以参考《第一个Spring程序》一节。
- 在 net.biancheng 包下创建 HelloWorld 和 MainApp 类。
- 在 src 目录下创建 Spring 配置文件 Beans.xml。
- 运行 SpringDemo 项目。
HelloWorld 类代码如下。
1 | package net.biancheng;public class HelloWorld { |
MainApp 类如下。
1 | package net.biancheng; |
Beans.xml 文件内容如下。
1 |
|
运行结果如下。
1 | message : 对象A |
从运行结果可以看出,两次输出内容相同,这说明 Spring 容器只创建了一个 HelloWorld 类的实例。由于 Spring 容器默认作用域是 singleton,所以如果省略 scope 属性,其输出结果也会是一个实例。
prototype
对于 prototype 作用域的 Bean,Spring 容器会在每次请求该 Bean 时都创建一个新的 Bean 实例。prototype 作用域适用于需要保持会话状态的 Bean(如 Struts2 的 Action 类)。
在 Spring 配置文件中,可以使用 <bean> 元素的 scope 属性,将 Bean 的作用域定义成 prototype,其配置方式如下所示:
1 | <bean id="..." class="..." scope="prototype"/> |
例 2
在例 1 的基础上,修改配置文件 Beans.xml,内容如下。
1 |
|
运行结果如下。
1 | message : 对象A |
从运行结果可以看出,两次输出的内容并不相同,这说明在 prototype 作用域下,Spring 容器创建了两个不同的 HelloWorld 实例。
Spring Bean生命周期
在传统的 Java 应用中,Bean 的生命周期很简单,使用关键字 new 实例化 Bean,当不需要该 Bean 时,由 Java 自动进行垃圾回收。
Spring 中 Bean 的生命周期较复杂,可以表示为:Bean 的定义 -> Bean 的初始化 -> Bean 的使用 -> Bean 的销毁。
Spring 根据 Bean 的作用域来选择管理方式。对于 singleton 作用域的 Bean,Spring 能够精确地知道该 Bean 何时被创建,何时初始化完成,以及何时被销毁;而对于 prototype 作用域的 Bean,Spring 只负责创建,当容器创建了 Bean 的实例后,Bean 的实例就交给客户端代码管理,Spring 容器将不再跟踪其生命周期。
Spring Bean生命周期执行流程
Spring 容器在确保一个 Bean 能够使用之前,会进行很多工作。Spring 容器中 Bean 的生命周期流程如下图所示。
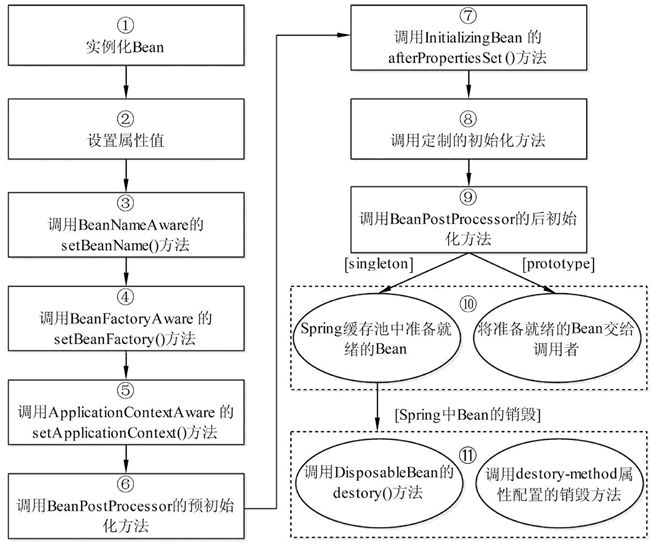
图 1 Bean 的生命周期
Bean 生命周期的整个执行过程描述如下。
- Spring 启动,查找并加载需要被 Spring 管理的 Bean,并实例化 Bean。
- 利用依赖注入完成 Bean 中所有属性值的配置注入。
- 如果 Bean 实现了 BeanNameAware 接口,则 Spring 调用 Bean 的 setBeanName() 方法传入当前 Bean 的 id 值。
- 如果 Bean 实现了 BeanFactoryAware 接口,则 Spring 调用 setBeanFactory() 方法传入当前工厂实例的引用。
- 如果 Bean 实现了 ApplicationContextAware 接口,则 Spring 调用 setApplicationContext() 方法传入当前 ApplicationContext 实例的引用。
- 如果 Bean 实现了 BeanPostProcessor 接口,则 Spring 调用该接口的预初始化方法 postProcessBeforeInitialzation() 对 Bean 进行加工操作,此处非常重要,Spring 的 AOP 就是利用它实现的。
- 如果 Bean 实现了 InitializingBean 接口,则 Spring 将调用 afterPropertiesSet() 方法。
- 如果在配置文件中通过 init-method 属性指定了初始化方法,则调用该初始化方法。
- 如果 BeanPostProcessor 和 Bean 关联,则 Spring 将调用该接口的初始化方法 postProcessAfterInitialization()。此时,Bean 已经可以被应用系统使用了。
- 如果在
中指定了该 Bean 的作用域为 singleton,则将该 Bean 放入 Spring IoC 的缓存池中,触发 Spring 对该 Bean 的生命周期管理;如果在 中指定了该 Bean 的作用域为 prototype,则将该 Bean 交给调用者,调用者管理该 Bean 的生命周期,Spring 不再管理该 Bean。 - 如果 Bean 实现了 DisposableBean 接口,则 Spring 会调用 destory() 方法销毁 Bean;如果在配置文件中通过 destory-method 属性指定了 Bean 的销毁方法,则 Spring 将调用该方法对 Bean 进行销毁。
Spring 为 Bean 提供了细致全面的生命周期过程,实现特定的接口或设置
了解 Spring 生命周期的意义就在于,可以利用 Bean 在其存活期间的指定时刻完成一些相关操作。一般情况下,会在 Bean 被初始化后和被销毁前执行一些相关操作。
Spring 官方提供了 3 种方法实现初始化回调和销毁回调:
- 实现 InitializingBean 和 DisposableBean 接口;
- 在 XML 中配置 init-method 和 destory-method;
- 使用 @PostConstruct 和 @PreDestory 注解。
在一个 Bean 中有多种生命周期回调方法时,优先级为:注解 > 接口 > XML。
不建议使用接口和注解,这会让 pojo 类和 Spring 框架紧耦合。
初始化回调
使用接口
org.springframework.beans.factory.InitializingBean 接口提供了以下方法:
1 | void afterPropertiesSet() throws Exception; |
您可以实现以上接口,在 afterPropertiesSet 方法内指定 Bean 初始化后需要执行的操作。
1 | <bean id="..." class="..." /> |
配置XML
可以通过 init-method 属性指定 Bean 初始化后执行的方法。
1 | <bean id="..." class="..." init-method="init"/> |
使用注解
使用 @PostConstruct 注解标明该方法为 Bean 初始化后的方法。
1 | public class ExampleBean { |
销毁回调
使用接口
org.springframework.beans.factory.DisposableBean 接口提供了以下方法:
1 | void destroy() throws Exception; |
您可以实现以上接口,在 destroy 方法内指定 Bean 初始化后需要执行的操作。
1 | <bean id="..." class="..." /> |
配置XML
可以通过 destroy-method 属性指定 Bean 销毁后执行的方法。
1 | <bean id="..." class="..." destroy-method="destroy"/> |
使用注解
使用 @PreDestory 注解标明该方法为 Bean 销毁前执行的方法。
1 | public class ExampleBean { |
示例
下面使用 Eclipse IDE 演示如何通过配置 XML 的方式实现初始化回调和销毁回调,步骤如下:
- 创建 SpringDemo 项目,并在 src 目录下创建 net.biancheng 包。
- 添加相应的 jar 包,可以参考《第一个Spring程序》一节。
- 在 net.biancheng 包下创建 HelloWorld 和 MainApp 类。
- 在 src 目录下创建 Spring 配置文件 Beans.xml。
- 运行 SpringDemo 项目。
HelloWorld 类代码如下。
1 | package net.biancheng; |
MainApp 类代码如下,该类中我们使用 AbstractApplicationContext 类的 registerShutdownHook() 方法,来确保正常关机并调用相关的 destroy() 方法。
1 | package net.biancheng; |
Beans.xml 配置文件代码如下。
1 |
|
运行结果如下。
1 | Bean正在进行初始化 |
默认的初始化和销毁方法
如果多个 Bean 需要使用相同的初始化或者销毁方法,不用为每个 bean 声明初始化和销毁方法,可以使用 default-init-method 和 default-destroy-method 属性,如下所示。
1 | <beans xmlns="http://www.springframework.org/schema/beans" |
来源 —— C语言中文网
)**
 微信
微信 支付宝
支付宝